Sunday, December 30, 2012

This Is The End

The end of what?  For months, we've been hearing that December 21st would be the end of the world.  Turns out, that was nothing more than a short-sighted calendar maker, the Ancient Mayan version of Y2K.  Nope, that's not the end that I'm referring to.

There were times over the last four days that I thought it was "the end", as I struggled with one of the worst colds or flu that I've ever had.  It takes a lot to completely knock me down, and I was down for a solid three days.  I've never been delirious from a fever before, but according to my wife, at one point I was rambling and didn't know where I was.  Nasty stuff, but I'm on the upswing now.  Nope, still not the end that I'm referring to.


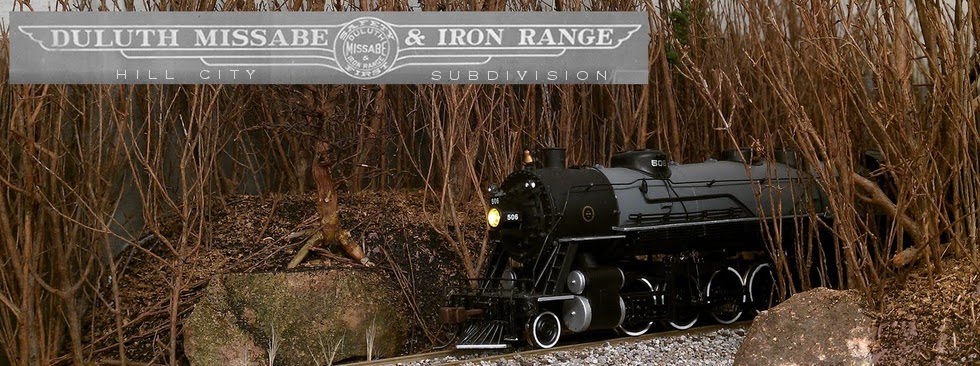
Is it the end of the line?  While it is true that in the photo you see, the line ends about a foot behind the locomotive, terminated by a mirror and, behind that, the wall of my basement.  Still, not the end that I'm referring to.

No, the end that I'm talking about is the end of the year.  The end of 2012.  Time to look back at the plans that I made and the goals that I set for myself this year:

  • I said that I wanted to complete the Author Achievement for the MMR.  Done.  In addition, I also completed the Volunteer Achievement.
  • I said that I wanted to publish 2 more articles in national magazines.  Done and Done.  I also had an article in the December issue of NMRA Magazine on which I shared credit with Gerry Leone and Lester Breuer.
  • I said that I wanted to get something, a photo or an article, into Model Railroader magazine.  Done.  They published two of my photos, one in March, one in September.
  • I said that I wanted to attend to the 2012 TLR Convention in Sioux Falls.  Done
  • I wanted to complete two major structures for the layout, one of them being the depot.  The depot is almost finished, but there is no second structure nearing completion at this time.
  • I was planning to present two clinics for the local Twin Cities Division, covering scratchbuilding techniques.  Done.  I actually did one clinic on scratchbuilding, and one on natural scenery.

Looking at that list, I have to say 2012 was a successful year for me, at least in terms of this hobby.  I certainly have no complaints, except the ever-present "I wish I had more time" complaint.

What's ahead for 2013?  Aside from some obvious things, I'm not sure, I haven't really thought about it.

  • The 2013 TLR Convention is here in the Twin Cities, so there won't be a trip to some exotic location like Sioux Falls or Dubuque this year.  I also didn't have the sense enough to lay low, I volunteered to help organize and promote the thing, and it looks like I'll be presenting at least one clinic, possibly two.
  • I'd like to publish three articles this year.  One is already on deck, slated for sometime this spring.  I have another partially written, and nothing lined up yet for a third.
  • Now that I own a "real" camera, I think I might try to get a photo into the 2014 NMRA calendar or possibly even Model Railroader's 2014 calendar.
  • Now that I've perfected the scratchbuilt double-hung window, I'm going to start construction of the Lakeside Inn, with the intent of finishing it in 2013.
  • My term as the PR guy for the Thousand Lakes Region ends in May.  I've been approached about taking over as editor of The Fusee.  Unless I talk myself out of it in the next 5 months, I'll probably assume that role this year.

Isn't that a great list?  Only one thing on there even remotely comes close to "playing with toy trains" - that's the construction of the depot and the inn, and I consider that more a form of art than anything.  The rest of the things on that list involve writing, photography, public speaking, education, leadership, and a variety of other skills that have nothing to do with toy trains.  That's what makes this such a fun hobby - there are countless ways to be involved, including actually playing with toy trains.

Sunday, December 23, 2012

Under The Lights

With the fake interior installed, and the structure permanently glued down, it's time to turn on the lights and see if the illusion works.  First, let me apologize for the lousy photos - I'm struggling to find the right technique for getting good shots of the lit interior.  There's a trick here that I just haven't figured out yet.

Here's looking in through the bay window at one of the figures seated on a bench in the waiting area.  You can also see his buddy standing beside him, and the clerk at the ticket counter.  Part of the horrid linoleum floor is visible as well.


I haven't decided what this guy is doing yet.  He's too well-dressed to be a depot worker.  My best guess at this point is that he's a professor from Minneapolis, accompanying some secret cargo travelling from the West Coast.  Some mysterious relic from South America or the South Pacific perhaps?


There's some sort of tall tale being told here.  From the posture, it must involve wrestling a bear.


That's all I have for now.  The photos really don't do justice to the lighting, it has to be seen first-hand to get the full effect.  Or I need to figure out how to take the pictures correctly.

It's Getting Crowded In Here

The depot interior is finished.  I built benches for the waiting area, put down a horrid blue and white linoleum floor, and place a few figures in strategic locations to create the illusion of a busy depot.  The two seated figures were originally wearing shorts, not exactly appropriate for November in northern Minnesota, especially in 1920.  Also not appropriate was the bright yellow dress that the female figure was wearing.  Since these people will barely be visible, and will be viewed through plastic windows, detail isn't super important, but that bright yellow dress would have been out of place.  I painted the dress brown, and painted over the bare legs on the two seated men.


As I said, detail isn't really important for the figures in the waiting area, they simply need to provide some colors and shadows to provide the sense that there people inside.  The freight area is a different matter.  Since it has large open doors, the interior is clearly visible.  Detail DOES matter here.  I spent a lot more time on the pieces for this section.  The crates are cast metal, carefully painted with multiple shades of brown and gray, then washed and weathered to look like wood.


I still have a couple of pieces to add to the freight room - a scale, a couple of brooms, just an assortment of stuff to make it look "lived in".  The waiting area is completely finished.  It has to be - the depot structure is now permanently attached to the platform.  There's no way to get in there to add more.

Friday, December 21, 2012

Holiday Visitors

Tomorrow I'm having visitors.  The father of a co-worker is in town for Christmas and wants to see the layout.  The good thing about this - it's a reason to clean up the layout.  The bad thing - I have to clean up the layout.

Things are all tidy now, the tools are put away, the work surface cleaned off, scraps are in the Bucket O'Crap, and there's nothing sitting on the layout that doesn't belong on the layout.  I cleaned the track, and did a quick systems check to make sure everything still runs.

To make things a little more interesting for my guests, I dug through my assortment of little people, and found a few holiday travelers to add to the depot.  The checkers players have moved back outdoors as well.


Monday, December 17, 2012

The Lights Are On, and Somebody's Home

The wallpaper has been hung, the carpet's installed, and the lights are permanently wired up.  Looks like the railway agent and his family have moved in - somebody's peeking out of an upstairs window.


As you can see, I used warm yellow LED's throughout the structure, upstairs, downstairs, and in the freight area.  Five bulbs in total, each with its own resistor, soldered and heat-shrinked, held in place with hot glue in case I ever need to replace one.  The upstairs ceiling lifts out to give me access to the first floor bulbs.


The upstairs windows are covered with curtains made from toilet paper (clean, I think).  They're just transparent enough to allow some colors and shadows to be visible.  The one window with the open curtain, the one shown above, allows just enough to be seen to create the illusion of a fully detailed upstairs.

All it needs now is a finished roof, some crates in the freight room, and a few people to make it complete.


Saturday, December 8, 2012

It's Warm In Here

Remember the two fellas who were deeply involved in a lively game of checkers?  Well, it snowed last night in Minnesota, and it's cold outside, so they've moved indoors, under the newly installed warm yellow LED lighting.


Conveniently, the freight doors were also installed today, so if the warm lighting isn't enough to keep out the cold, they can shut the doors!


Sunday, December 2, 2012

The Weather Outside Is Frightful

All of the window and door trim is installed, basic structure is complete, and the walls are sporting a shiny new coat of paint.


Looks good, right?  Well, anybody who has ever painted their own house knows that it doesn't last long enough.  Sooner or later, the weather takes a toll, and that flawless finish starts looking a little tired, something like this:


As I mentioned earlier, with the weathering applied, it's impossible to tell that I forgot to paint the window frames.  It's also very difficult to tell that the door is actually printed on paper.  The weathering does a beautiful job of tying it all together.


Up next, finishing the (moveable!) freight doors, then on to the roof.  It's coming together!

A Little Holiday Trimming

The doors were all hung in the doorways with care,
In hopes that the passengers soon would be there.
The knobs were installed all snug in their holes,
Ummm, uhhhh, something, something...

 OK, that's as far as I can take this.  Seriously though, the front and rear entry doors are installed, including door knobs!


The door is actually a photo of a door, printed with my inkjet printer, then glued to a piece of cereal box cardboard.  The knob is the head of a tiny wire brad, snipped off and poked through a hole in the door.  Not exactly to scale, but the larger size sort of emphasizes that "this door has a door knob!".

But wait, there's more!  I also started on the trim around the doors and windows.  All of the pieces have been cut, from scale 1"x4" stock.  Here they are, stuck to the sticky side of a lint roller sheet, waiting to be painted.  The sticky paper holds them still so that I can paint them all at once, and helps to keep them from warping.


After painting, installation is a simple matter of gluing the pieces in place around the various windows and doors.


Looking at that last photo, you may be asking yourself "Is that trim really painted?".  Yes, it is, and yes, I purposely chose a color that is very much the same color as the bare wood.  Why?  Because I realized well into the installation of the windows that I had forgotten to paint the window frames before installing the window glass.  Knowing that it would be impossible to paint them without getting paint on the glass, I chose to hide my mistake in plain sight.  Once the weathering has been done, you won't be able to tell that the frames are unpainted.

Sunday, November 18, 2012

An Open And Shut Door

Sixty degrees and sunny in mid-November?  In Minnesota?  This is supposed to model railroading season, but weather like this makes it hard to get in the mood.

I've mentioned a few times that I wanted the freight doors on the depot to be movable, so that I could open or close them at will.  I've thought long and hard about how to do that.  After a couple of failed efforts, I found the answer, and it works REALLY well!


Starting with Plastruct "U" channel, item #90582, I cut a piece 24 scale feet in length, long enough to allow the door to be opened all the way with room to spare.  To this "U" channel, I glued a piece of  #90713 strip, also 24 feet in length.  This gave me a nearly enclosed rectangular channel with a small gap along one edge.


Using Plastruct's "Z" channel, item #90592, I made hangers, gluing them to the top edge of the door using CA.  These z-shaped hangers fit right into the gap in the rectangular channel that I built.


The result is a convincing hanging door.  The track is slightly larger than scale, but it works for me, and gives me the sliding door that I wanted.


After painting and weathering, I now have one nice-looking hanging freight door.


After a light dosing of graphite, the door slides freely along the track, allowing me to open or close the door as I see fit.  Exactly what I wanted!


Sunday, November 4, 2012

It's What's Inside That Counts

Wrapping up another four-day weekend, minus the work-related interruptions on three of those days.  I had high hopes of getting a lot done on the depot, but didn't get quite as far as I'd hoped.  I did, however, manage to get the interior roughed in, and some lighting wired in place.


Using wallpaper patterns that I downloaded from http://www.cgtextures.com/, I finished the interior walls on the second floor, and most of the downstairs lobby.  There is still a lot of interior detail to add, and a few "leaks" to plug, but this is a good start.


The lights that I'm using are wide-angle white 5mm LED's, running on a 9V battery just to allow me to take these photos.  I may swap them out, as I'm not entirely happy with the blue light that they produce.  I really wanted something "warmer", more yellow.  That'll come later - for now, progress is progress!


Saturday, October 20, 2012

Siding Done

It's been 44 days since my last post here.  Included in those 44 days were six weekends, two weeks without the wife around, plus 5 vacation days.  You would think I'd have made some progress on the depot during that time.  Sadly, you'd be wrong.  I haven't really touched it much until this week.  I am a pathetic excuse for a model railroader.

Aside from that, I've made some progress over the last couple of days.  The biggest achievement is finishing the clapboard siding.  It's DONE!  I've also finished building and installing all of the windows, including the bay window, and I've measured and cut the panels for the roof.  Obviously, I won't be permanently attaching that until I've decided what I'm going to do with the interior.


Thursday, September 6, 2012

Bay Watch

Greetings, loyal follower.  When last we spoke, I mentioned that I hadn't yet figured out how to build the bay window on my depot.  After much trial and error, I've managed to produce something that I can live with.


What you see there is simply three individual double-hung windows, glued together side-by-side to form half of a hexagon.  The siding underneath the windows looks a little rough in the photo, but I think once the vertical trim is installed, it will look better.  The next challenge will be the roof over the bay window.

Wednesday, August 22, 2012

Quest For The MMR: Volunteer

Two down, five to go.  Two what?  Five what?  If you've been following along for the past year, you know what I'm talking about.

Today the postman came bearing gifts - my Association Volunteer certificate.  The second of seven certificates needed to complete the NMRA's Master Model Railroader achievement program.


Depot Update

It's been a month since I last posted. A whole month. Where did the time go?

Anyway, I thought I'd share a quick update on the depot progress. I'm still working on windows and siding, admittedly not as much as I'd like to be.


Three sides are done, nine of the thirteen windows are installed.  I still haven't figured out how I'm going to build the bay window.  I'm also trying to figure out a way to make the freight doors movable, so that they can be opened and closed.  Then there's the interior, which will be a whole 'nother project.

Wednesday, July 18, 2012

Checkers Anyone?


I'm test-driving a new camera, my first DSLR.  The photo above, and the one below, were taken with the new camera.  


Why do I need, OK, want, a new camera?  What's wrong with the old one?  Well, there's nothing "wrong" with the old one, it takes great photos.  In spite of that, it's not a DSLR, and the intent all along was to use it as a learning tool before investing in something more expensive.  I caught a lucky break when a good friend of mine, who is also upgrading his equipment, offered to sell me his DSLR at a can't-say-no price.

I still haven't answered the question as to "why" I want a better camera.  That's a deep question, or more precisely, a depth question.  Without getting into f-stops and other photography jargon, I'll just ask you to look at this photo:


The image on the left is from the old camera, the one on the right from the new camera.  In both photos, the boxcar and the tracks are in focus.  Moving back to the two guys on the platform, they're a little out of focus in the left image, but still sharp in the right image.  Moving further back to the background trees, they're completely out of focus in the left image, but nicely focused in the right image.  This is called "depth of field", and my old camera has a very limited depth of field.  Unfortunately, taking good model photos requires a good depth of field, thus the desire for a better camera.

How Long Does It Take...

... to build 4 HO scale double-hung windows from scratch?  About two weeks, judging from the time since my last post.  Ok, that's an exaggeration - I've also finished the siding on the front of the depot.


It's actually not that bad building these things, now that I have a system (more on that later) figured out.  The hardest part is not rushing things, trying to move too fast without letting the glue dry thoroughly.

As you can see, with careful measuring and a little filing, they fit nice and flush with the siding.


They even have "glass" installed!


Now, somebody pass the Windex...

Sunday, July 1, 2012

Plastic Glass

Another afternoon of guilt-free modeling, thanks to it being 90 million degrees outside - too hot to do anything.  I spent the time building a couple of "practice" windows, before finally settling on a technique that I like.  The technique is simple - build the upper sash first (the one in the front), then glue top and both sides of the surrounding window frame to the sash.  Build the lower sash, glue it in place behind the upper sash, the glue the bottom piece of the window frame in place.  For variety, you can build some of the windows with the lower sash partially raised, to create an open window.

Here's the pick of the litter from today's efforts:


The window "glass" is clear plastic, cut from an Atlas turnout package.  I've mentioned this in an earlier blog post, but I'll repeat it here for context.


Here's how it looks installed in the depot, with the siding partially completed around it.


One window done, 12 more to go!

Saturday, June 30, 2012

Installing Windows

No, not the PC operating system that we all love to hate, although that title should attract a whole new demographic to the blog.  Yes, I've installed that "version" of Windows many times, but that's not what this post is about.  This post is about windows that you look through, the type with glass in them.

There will be 13 windows in the depot, plus the bay window.  As with everything else, I'm trying to scratchbuild them instead of buying commercial windows.  Yes, I know I could buy something from Grandt Line and be done already, but that's not the point.  The point is to challenge myself and improve my modeling skills.  Popping a plastic window into a hole in the wall doesn't really do that.

So, in the interest of challenging myself, I'm doing this the hard way.  I'm using scale 1"x2" strip wood to build the upper and lower window sections.  Window glass will be added after these are painted.


These upper and lower sections will fit into individual window frames, built from scale 1"x6" strip wood.


The frames will, in theory, fit into the window openings cut into the depot walls.


Obviously, there will be some trimming and sanding needed, and possibly some foul language, to get them to fit just right.  I think the results will be well worth it.